
Imagine you’re an artist, and you’re always on the lookout for ways to make your digital creations even more dazzling. Well, good news!
Procreate’s Symmetry Tool is here to lend you a hand. It’s like having a magical helper that effortlessly doubles your creativity.
With just a few clicks in the menu, you can whip up designs that used to take hours in mere seconds. It’s not just about replicating, though. This tool encourages exploration.
You can doodle and experiment, stumbling upon fresh patterns you never knew were hiding in your imagination.
Ready to dive in. Let’s explore every nook and cranny of Procreate’s Symmetry Tool together, unlocking the secrets to your next masterpiece!
What is the Symmetry Tool in Procreate?
The Symmetry Tool in Procreate is like having a magical mirror for your drawings.
When you turn it on, whatever you draw on one side gets mirrored perfectly on the other side. It’s fantastic for creating precise and symmetrical designs without the hassle of drawing each part separately.
Imagine drawing a butterfly – with symmetry on, you only need to draw half of it, and Procreate takes care of the rest, making sure both wings are identical.
This tool is super handy for creating things like mandalas, snowflakes, or even faces where getting both eyes to look the same can be tricky.
It’s not just for art though; if you need to make precise shapes or technical drawings, symmetry can save you a lot of time and effort.
Whether you’re an artist looking for perfection or someone who needs to draw straight lines and perfect circles, the Symmetry Tool in Procreate is your best friend.
How To Turn On Symmetry In Procreate?
To turn on symmetry in Procreate, first, make sure you’re on a new canvas.
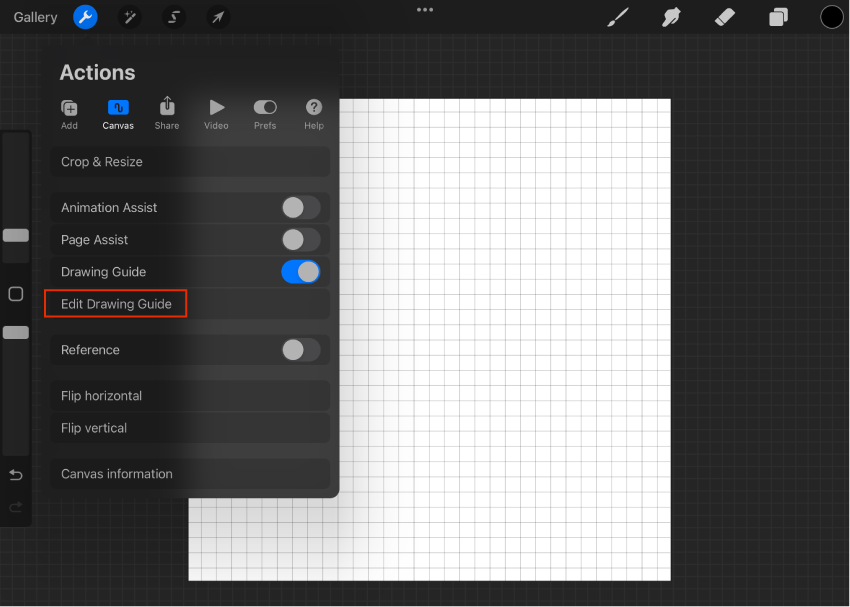
Then, look at the top left corner for the Editing Tools. There, you’ll see a wrench icon, which is the Actions tool. Tap on it. Now, a menu will pop up. Look for the Canvas option and select it.
Within the Canvas settings, you’ll find something called Drawing Guide. Tap on it. You’ll see a slider appear. Move this slider to the right. This action will turn on the Drawing Guide, which includes symmetry options.
That’s it! You’ve successfully turned on symmetry in Procreate. Now, you can create symmetrical drawings with ease.
How to Adjust the Symmetry Tool?
To adjust the Symmetry Tool in Procreate, follow these easy steps:
- Step 1: Open your drawing and tap on “Edit Drawing Guide” to access the settings.

- Step 2: In the “Drawing Guides” window, locate the Symmetry Tool by tapping the Symmetry button at the bottom. Here, you can adjust the Opacity and Thickness sliders to customize the appearance of your drawing lines.
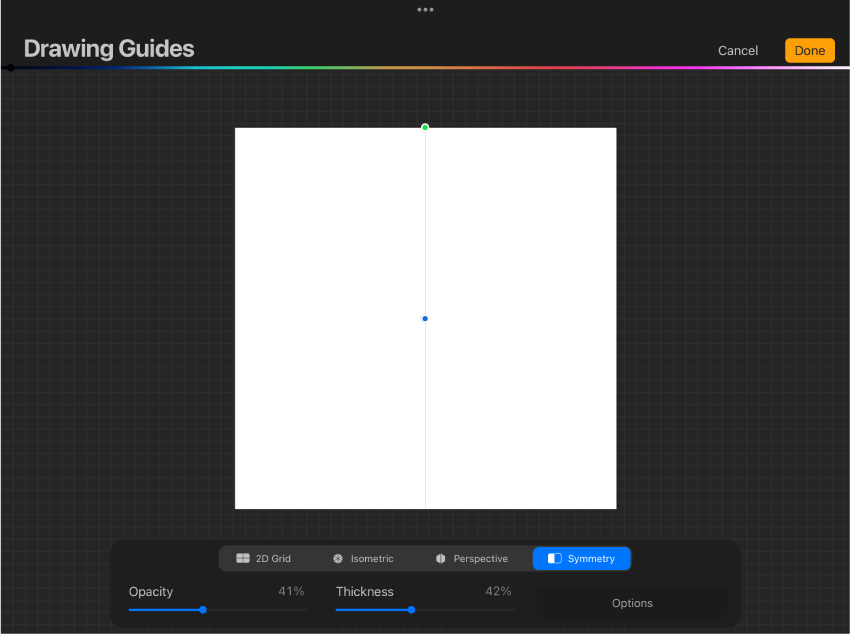
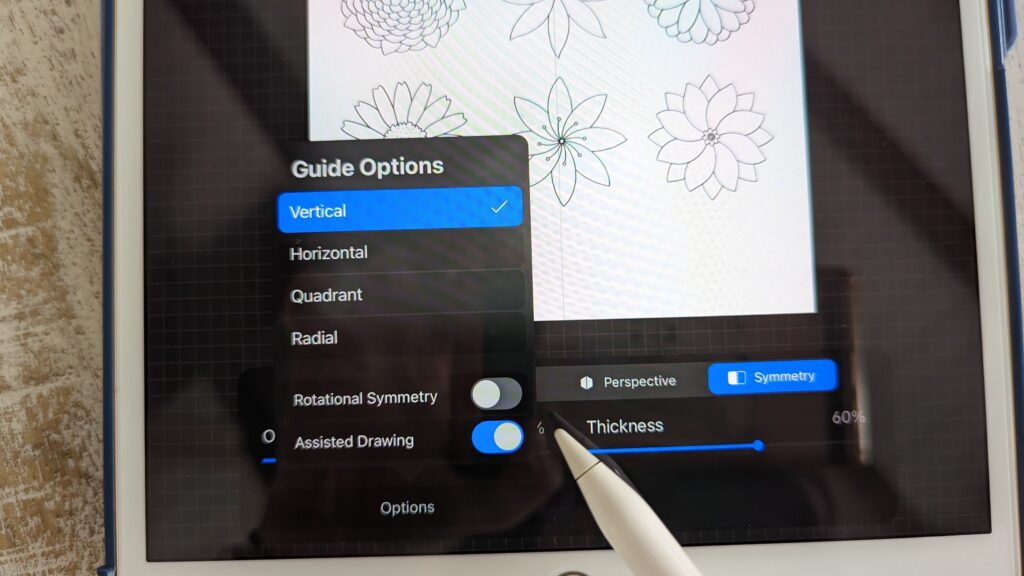
- Step 3: Move to the right and tap on the “Options” button to access the Guide Options menu. You’ll find options like Vertical, Horizontal, Quadrant, and Radial symmetry. Typically, Vertical symmetry is selected by default. Ensure that Assisted Drawing is enabled. In the middle of your canvas, there’s a blue dot representing the axis. You can move it to adjust the axis position. At the top of the canvas, there’s a green dot to rotate the axis.
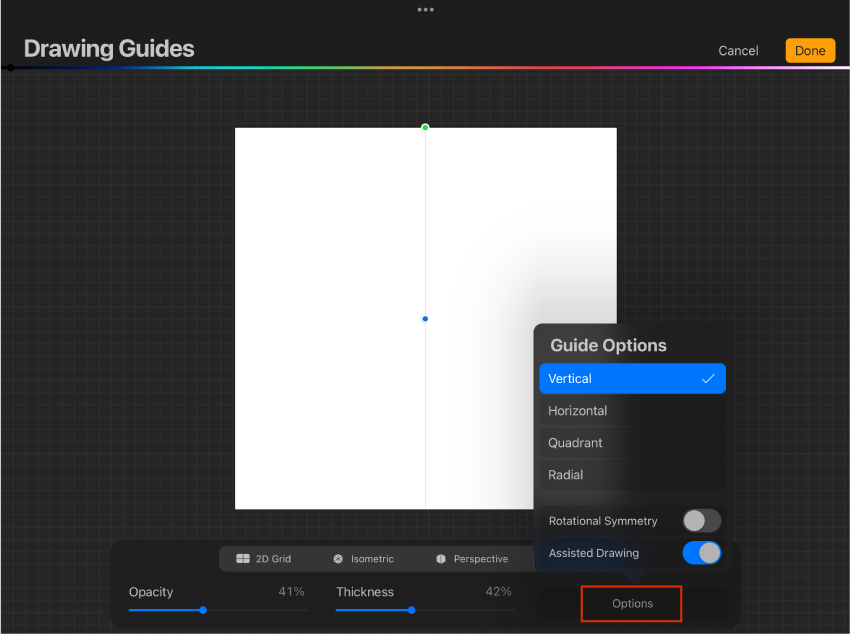
- Step 4: Choose your preferred guideline color from the colorful line at the top of the window. Once you’re done customizing, tap “Done.” Now, anything you draw on one side of the canvas will be mirrored on the other side in real-time.

How to use the Vertical, Horizontal, Quadrant, and Radial options of the Symmetry Tool?
Using the Symmetry Tool in Procreate allows you to create symmetrical drawings effortlessly.
Let’s break down how to use each option:
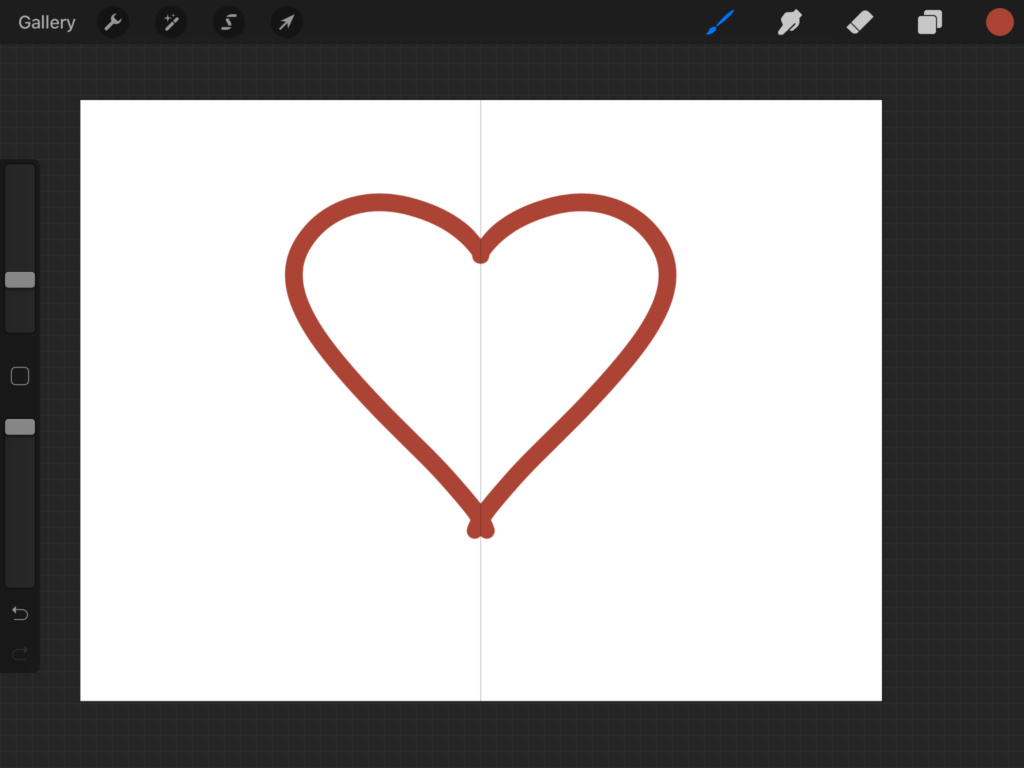
Horizontal Symmetry Tool:
- Activate the Symmetry Tool by going to Actions > Canvas > Edit Drawing Guide.
- Click on Options and select Horizontal.
- Ensure Assisted Drawing is enabled and press Done.
- Draw on one side of the canvas, and it will mirror on the other side. Perfect for creating symmetrical objects like hearts or beetles.
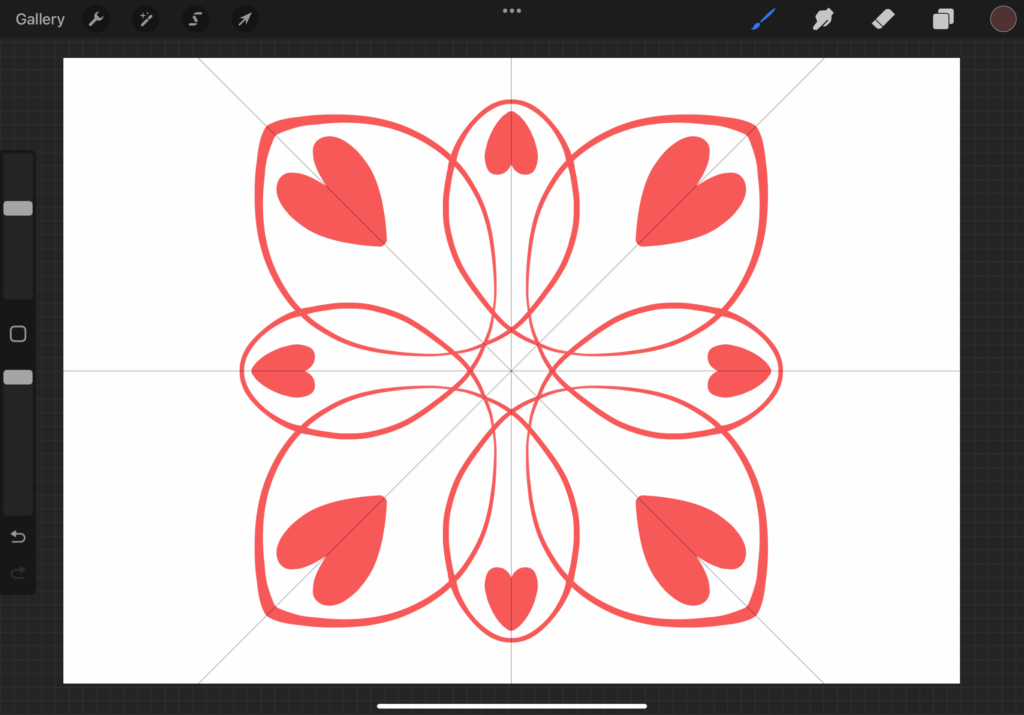
Quadrant Symmetry Tool:
- Follow the same steps as above but choose Quadrant.
- Keep Assisted Drawing active and press Done.
- Drawing in one quadrant mirrors across all four quadrants, allowing you to create intricate tiles or patterns easily.
Radial Symmetry Tool:
- Again, access the Symmetry Tool and choose Radial.
- Make sure Assisted Drawing is on and press Done.
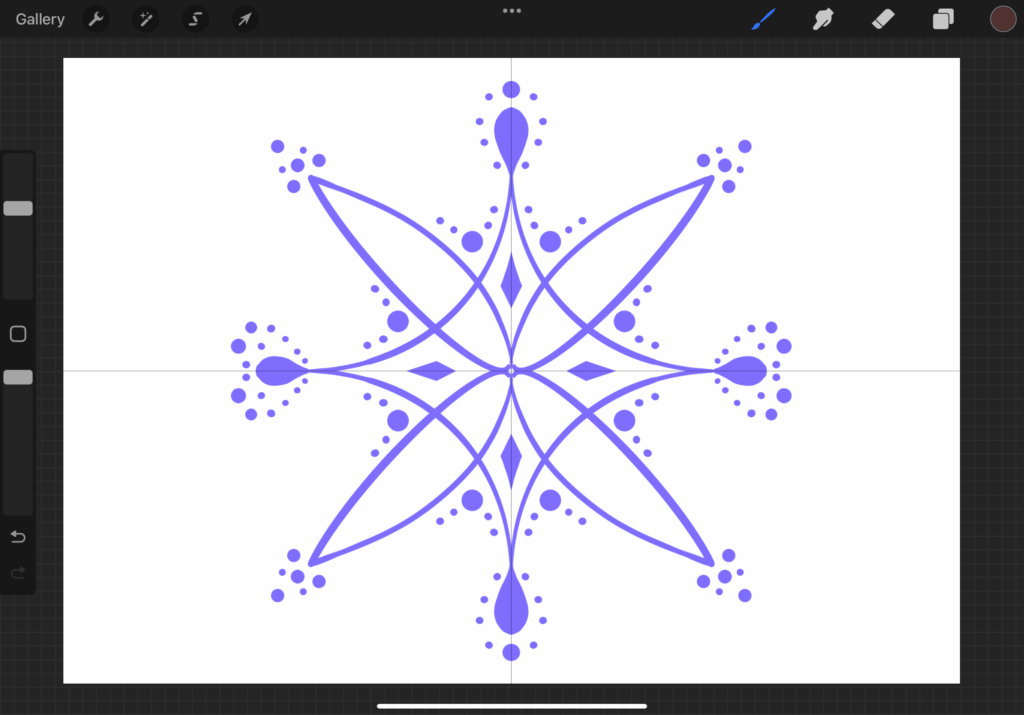
- Drawing in one section of the canvas reflects across multiple sections, ideal for crafting mandalas or radial designs.
Rotational Symmetry Tool:
- Navigate to the Symmetry Tool and select Radial as before.
- Keep Assisted Drawing enabled and additionally switch on Rotational Symmetry.
- Press Done and draw to see your design rotate around a central point, great for creating swirling patterns.
Remember, you can always turn off Assisted Drawing by selecting your layer in the Layers tool and unchecking Drawing Assist.
With these Symmetry Tool options, you can now effortlessly create symmetrical drawings in Procreate, from faces to flowers to intricate mandalas. Happy drawing!
The Importance of Procreate’s Symmetry Assisted Drawing Setting
The Symmetry Assisted Drawing setting in Procreate is a crucial tool for artists, but it’s easy to overlook its importance.
To ensure it works properly, you need to activate it within the Options tab or through the Layers tab for specific layers.
Here’s why it matters:
- Activating Symmetry: Without turning on the Assisted Drawing option, the symmetry feature won’t function. This is a fundamental step to make sure your artwork reflects the symmetry you intend.
- Preventing Mistakes: It’s easy to accidentally disable the Assisted Drawing feature and then wonder why the symmetry isn’t working. Activating it initially ensures you won’t encounter this frustrating issue.
- Layer Flexibility: The ability to toggle Assisted Drawing on and off for individual layers provides significant flexibility. You can activate symmetry only when needed for certain parts of your artwork, giving you control over its application.
- Visual Indicators: You can easily see which layers have Assisted Drawing enabled by looking at their thumbnails. This “Assisted” label helps you keep track of where symmetry is being applied in your project.
In essence, utilizing Procreate’s Symmetry Assisted Drawing setting properly ensures smoother workflow, fewer mistakes, and greater control over your artwork’s symmetry. It’s a small detail that can make a big difference in your creative process.
Tips and Tricks on Using Symmetry in Procreate
Using symmetry in Procreate can really speed up your drawing process and add a cool twist to your artwork.
Let me break down some tips and tricks for you:
- Quick Draw with Mirror Symmetry: Imagine you’re drawing something that’s symmetrical, like a cute chibi character. Instead of painstakingly drawing both sides separately, you can use the Mirror Symmetry feature. Just set up Vertical Symmetry from the Drawing Guide menu, draw on one side, and watch as Procreate mirrors it on the other side automatically. It saves you time and effort!
- Mandala Magic with Radial Symmetry: Mandala drawings look intricate, but with the Symmetry tool, they’re a breeze. Start with Radial Symmetry activated in the Drawing Guide Menu. Then, simply draw some basic shapes and lines on your canvas. Voila! You’ve got yourself a beautiful mandala pattern. Experiment with different shapes and even switch to a Rotational setting for varied patterns.
- Geometric Patterns with Quadrant Symmetry: If you’re into geometric designs, Quadrant Symmetry is your friend. Activate it in the Drawing Guide Menu, then pick a shape like a square, triangle, or circle. As you draw on the canvas, watch how the symmetry creates an intriguing pattern. Mix up sizes and directions to add more depth to your design.
So, whether you’re drawing characters, mandalas, or geometric patterns, Symmetry in Procreate opens up a world of creative possibilities.
Start simple and gradually explore more complex patterns as you get the hang of it. Happy drawing!
Conclusion
Procreate’s Symmetry Tool is an innovative feature that makes creating symmetrical art a breeze for digital artists – a companion effortlessly mirroring creative strokes to unveil beautiful patterns with a simple toggle, achieving in moments what once demanded meticulous effort and freeing artists to explore uncharted creative territories.
It fosters a symbiotic artist-tool relationship, nurturing a journey of discovery and self-expression, inviting us to embark together and unravel the endless possibilities, breathing life into symmetrical marvels and unlocking the door to our next masterpiece, one stroke at a time in this boundless realm of creativity. Get ready to create!
Leave a Reply