
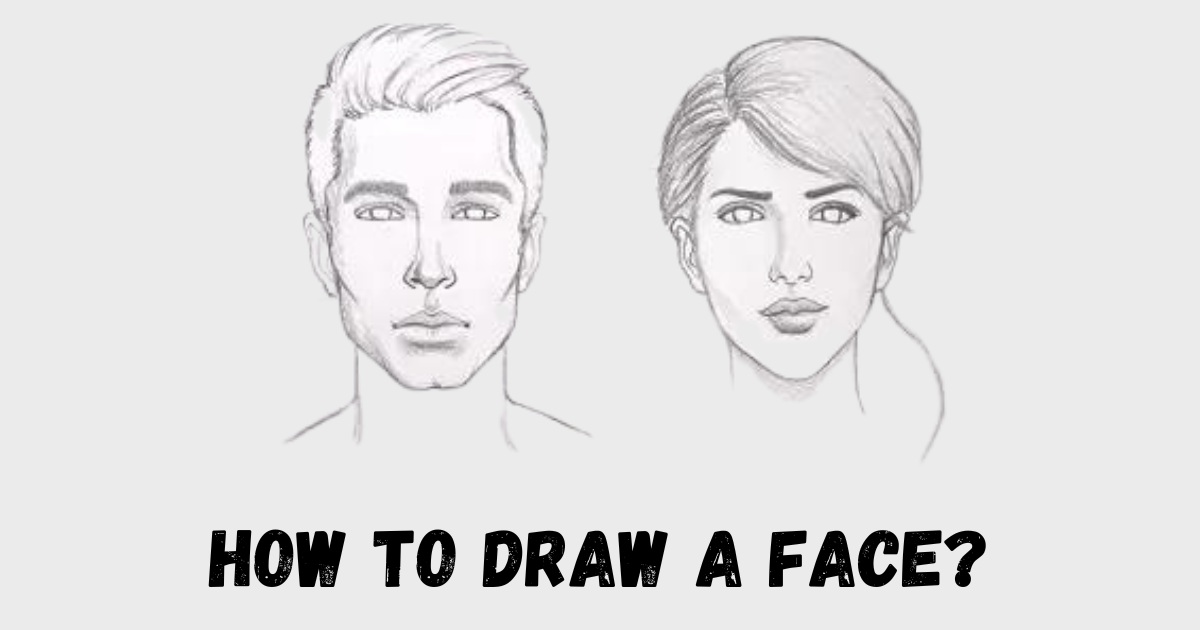
Drawing faces is a fundamental skill for any artist, whether you’re a beginner or a seasoned professional.
Capturing the likeness, emotions, and unique features of a person’s face can be challenging, but with practice and the right techniques, anyone can learn to create stunning portraits.
In this comprehensive guide, we’ll walk you through the process of drawing faces, from understanding facial proportions to adding the final details that bring your drawings to life.
The Basics of Face Drawing
Before diving into the step-by-step process of drawing a face, it’s essential to grasp the basics. This includes understanding facial proportions, observing different face shapes and features, and gathering reference materials.
Understanding Facial Proportions
The human face follows certain proportional guidelines that can help you create a balanced and realistic drawing.
As a general rule, the face can be divided into three equal parts vertically: from the hairline to the eyebrows, from the eyebrows to the bottom of the nose, and from the bottom of the nose to the chin.
Horizontally, the face is roughly five eyes wide, with the distance between the eyes being equal to one eye width.
Observing Different Face Shapes and Features
Faces come in a variety of shapes, such as oval, round, square, and heart-shaped.
Pay attention to the unique characteristics of each face shape and how they affect the placement of facial features.
Additionally, take note of the differences in eye shapes, nose sizes, and lip forms to create diverse and interesting faces.
Gathering Reference Photos or Real-Life Examples
Having reference materials is crucial when learning to draw faces.
Collect photographs of people with various face shapes, ages, and ethnicities, or observe people in real life to study their facial features and expressions.
This will help you develop a better understanding of how faces look and how to translate that knowledge into your drawings.
Drawing a Face: Step-by-Step
Now that you have a grasp of the basics, let’s break down the process of drawing a face into manageable steps.
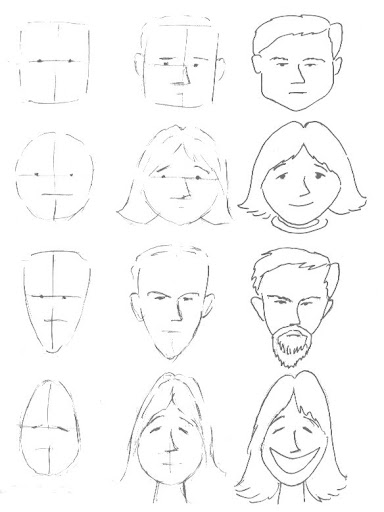
Step 1: Sketching the Basic Head Shape and Guidelines
Begin by lightly sketching a circle or an oval for the head shape.
Then, draw a vertical line down the center of the face to help you maintain symmetry.
Add a horizontal line halfway down the face for the eyes, and another horizontal line halfway between the eye line and the chin for the nose.
Finally, draw a line for the mouth slightly above the halfway point between the nose and chin.
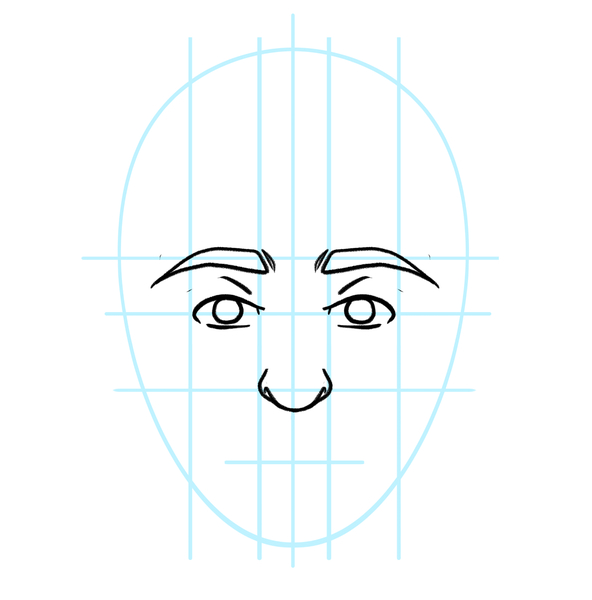
Step 2: Placing the Facial Features
Using the guidelines you’ve drawn, start placing the facial features.
- The eyes should sit on the eye line, with the corners of the eyes lining up with the edges of the nose.
- The nose should be centered on the vertical line, with the nostrils sitting on the nose line.
- The mouth should be placed on the mouth line, with the corners of the mouth lining up with the center of the eyes.
Step 3: Refining the Eyes, Nose, Mouth, and Ears
Once the facial features are in place, begin refining them.
For the eyes, draw the upper and lower eyelids, iris, and pupil. Add the eyebrows above the eyes, following the natural curve of the brow bone.
For the nose, define the bridge, nostrils, and tip. The mouth should have a clear separation between the upper and lower lips, with the upper lip being slightly smaller than the lower lip.
Finally, draw the ears on either side of the head, with the top of the ears aligning with the eyebrows and the bottom aligning with the nose.
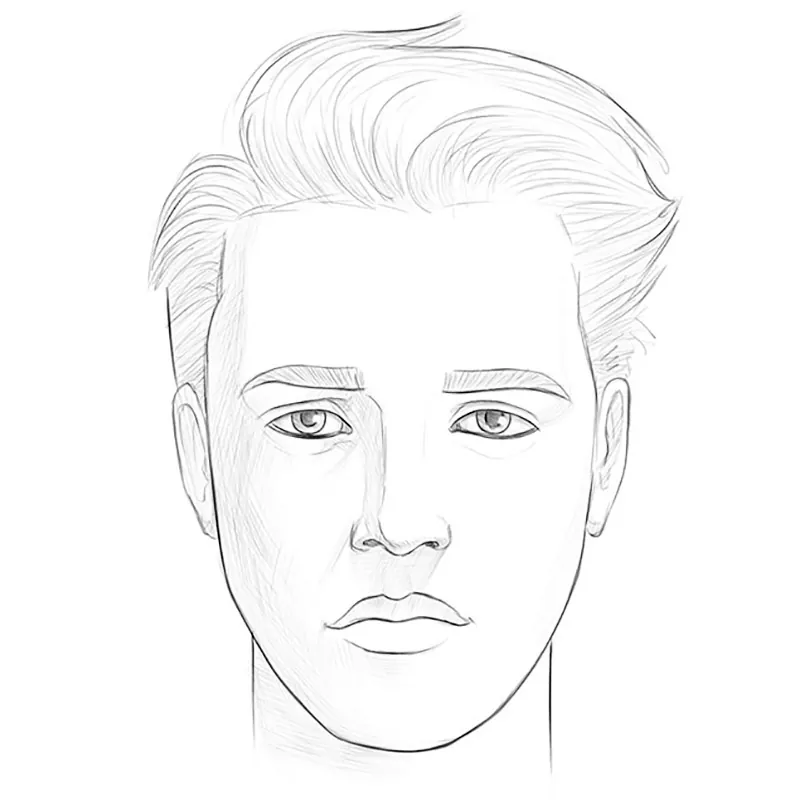
Step 4: Adding Hair and Final Details
With the facial features refined, it’s time to add the hair and final details.
.Draw the hairline and the general shape of the hair, considering the texture and style you want to achieve.
Add shadows and highlights to create depth and dimension in the face, paying attention to the areas beneath the eyebrows, nose, and chin.
Finally, refine any lines or details as needed to complete your face drawing.
How to Draw a Girl’s Face?

When drawing a girl’s face, there are certain characteristics and tips to keep in mind to capture a feminine appearance.
Characteristics of Female Facial Features
Female faces tend to have softer, more rounded features compared to male faces. The jawline is generally less angular, and the cheekbones are more prominent.
The eyes are often larger and more almond-shaped, with longer eyelashes. The lips are typically fuller and more pronounced, with a slightly upturned Cupid’s bow.
Tips For Drawing Feminine Eyes, Lips, and Hairstyles
To emphasize the femininity of a girl’s face, pay special attention to the eyes, lips, and hairstyle.
For the eyes, draw them slightly larger than you would for a male face, and add long, curled eyelashes. The lips should be full and soft, with a gentle curve to the Cupid’s bow.
When drawing the hair, consider styles that frame the face and add softness, such as loose waves, curls, or braids.
Examples and Variations of Girl Face Drawings
Practice drawing girls’ faces with different facial features, hairstyles, and expressions.
Experiment with various eye shapes, such as round, almond, or upturned, and try different lip shapes and sizes.
Play around with hairstyles, from short and pixie-like to long and flowing, to create a range of feminine looks.
Drawing a Boy’s Face
When drawing a boy’s face, there are certain characteristics and tips to consider to capture a masculine appearance.
Characteristics of Male Facial Features
Male faces tend to have more angular and chiseled features compared to female faces.
The jawline is usually more pronounced and square, and the brow ridge is more prominent. The eyes are often smaller and more deeply set, with thicker eyebrows.
The nose is typically larger and more angular, and the lips are less full than in female faces.
Tips For Drawing Masculine Jawlines, Noses, and Hairstyles
To convey masculinity in a boy’s face, focus on the jawline, nose, and hairstyle.
Draw a strong, angular jawline that is wider than the forehead. The nose should be larger and more prominent, with a straight or slightly curved bridge.
When drawing the hair, opt for shorter, more structured styles, such as crew cuts, fades, or spiky textures.
Examples and Variations of Boy Face Drawings
Practice drawing boys’ faces with different facial features, hairstyles, and expressions.
Experiment with various jawline shapes, such as square, round, or pointed, and try different nose shapes and sizes.
Explore a range of hairstyles, from short and neat to longer and more tousled, to create diverse masculine looks.
Easy Methods For Drawing Faces
If you’re a beginner or looking for a simplified approach to drawing faces, try these easy methods.
Simplifying the Face into Basic Shapes
Break down the face into basic geometric shapes to make the drawing process more manageable.
Use a circle or an oval for the head, triangles for the nose and ears, and curved lines for the eyes and mouth.
By focusing on these simple shapes, you can create a basic face structure without getting overwhelmed by details.
Using Light Lines and Minimal Shading
When starting a face drawing, use light, sketchy lines to map out the facial features and proportions.
This allows you to make adjustments easily without leaving heavy, difficult-to-erase lines.
As you become more confident with your placement, you can darken the lines and add minimal shading to create depth and dimension.
Focusing on Proportions and Placement
One of the most important aspects of drawing faces is getting the proportions and placement of the facial features correct.
By focusing on these elements first, you can ensure that your face drawing looks balanced and realistic, even if the details are simplified.
Step-By-Step Guide For Beginners
- Draw a circle or an oval for the head shape.
- Add guidelines for the facial features: a vertical line down the center, a horizontal line halfway down for the eyes, and another horizontal line halfway between the eye line and chin for the nose.
- Place the facial features using simple shapes: eyes on the eye line, nose on the nose line, and mouth slightly above the halfway point between the nose and chin.
- Refine the facial features by adding details such as eyelids, nostrils, and lips.
- Sketch the hair and add any final details or shading to complete your face drawing.
Sketching a Face From a Photo
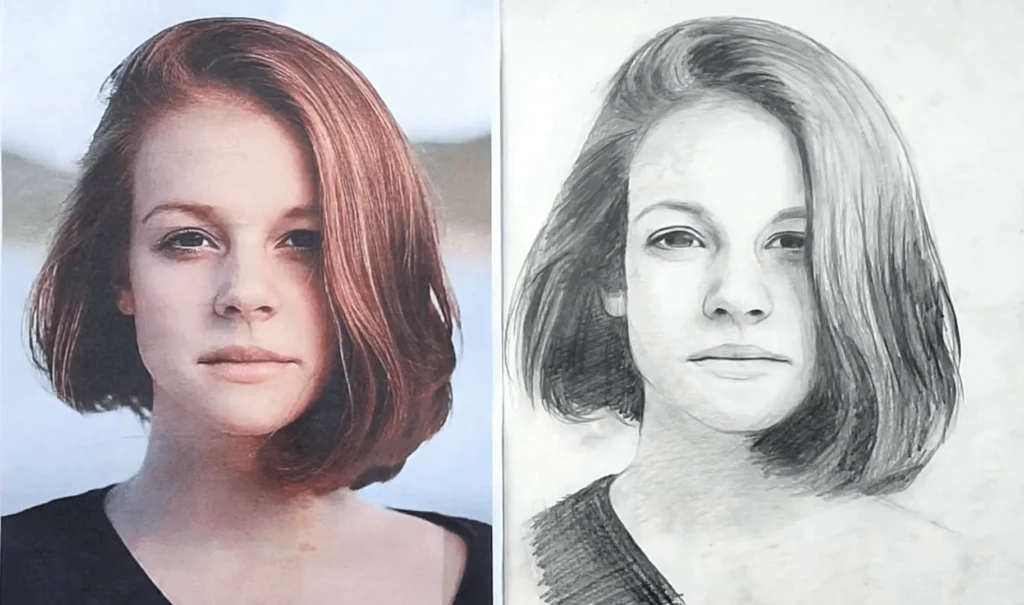
When drawing a face from a photo, you have the advantage of having a clear reference to work from.
Start by studying the photo closely, observing the facial proportions, features, and lighting.
Use the same basic steps outlined earlier, beginning with sketching the head shape and guidelines, then placing and refining the facial features.
Pay attention to the specific characteristics of the person in the photo, such as the shape of their eyes, nose, and mouth, and try to capture their likeness as accurately as possible.
How to Draw a Realistic Face?
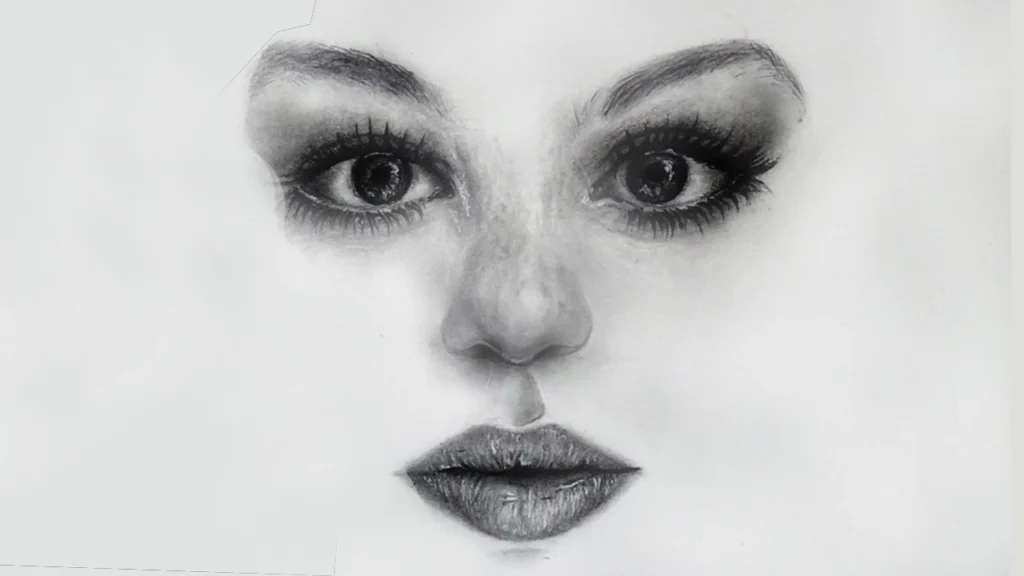
To create a realistic face drawing, you’ll need to focus on details, shading, and texture.
Begin with a well-proportioned sketch, then refine the facial features, paying close attention to the subtle curves and angles that define each element.
Use shading techniques, such as hatching, cross-hatching, or blending, to create depth, shadows, and highlights.
Consider the texture of the skin, hair, and other features, and use various line weights and shading methods to convey these textures realistically.
Drawing Faces With Pencil

Pencil is a versatile and accessible medium for drawing faces.
It allows for a wide range of tones and textures, from light and delicate to dark and bold.
When drawing with pencil, start with light, sketchy lines to map out the face, then gradually build up the details and shading.
Use a variety of pencil grades, from hard (H) to soft (B), to achieve different line weights and tonal values.
Experiment with different pencil techniques, such as stippling, hatching, or blending with a tortillon, to create various textures and effects.
Face Drawing For Kids
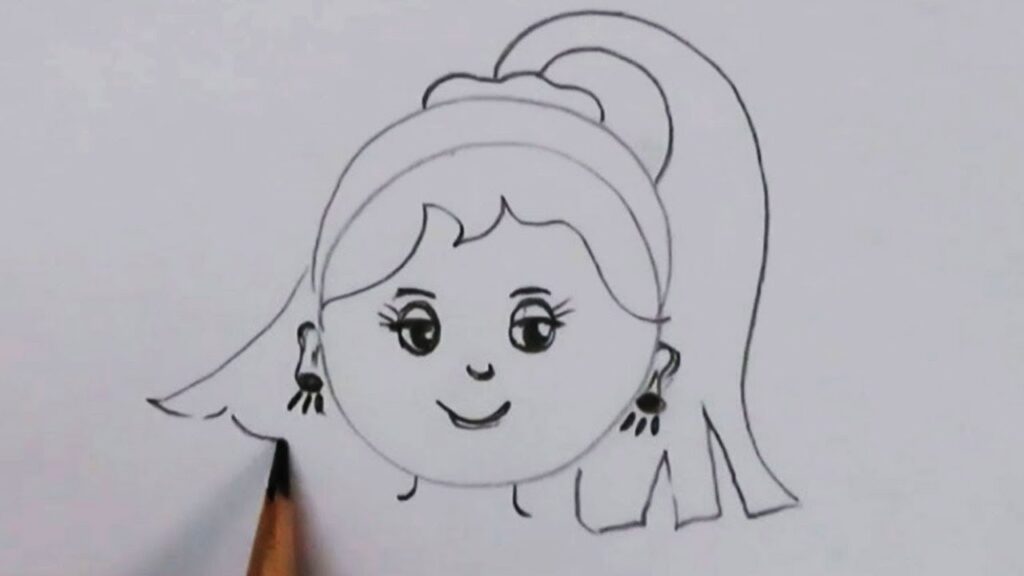
Drawing faces can be a fun and rewarding activity for kids.
To make the process easier and more enjoyable, start with simple, cartoon-like faces that focus on basic shapes and expressions.
Encourage kids to experiment with different eye shapes, mouth positions, and hairstyles to create a variety of characters. Use step-by-step tutorials or guided drawing exercises to help kids understand facial proportions and placement.
Most importantly, keep the process light-hearted and stress-free, allowing kids to express their creativity and have fun with their face drawings.
FAQ’s:
What are the Most Important Things to Consider When Drawing a Face?
When drawing a face, the most important things to consider are facial proportions, placement of features, and capturing the individual’s likeness.
Pay attention to the size and position of the eyes, nose, and mouth relative to each other and the overall face shape.
Observe the unique characteristics of the person you’re drawing, such as the shape of their features or the texture of their skin, and try to incorporate these elements into your drawing.
How Can I Improve My Face Drawing Skills?
To improve your face drawing skills, practice regularly and study a variety of faces. Observe people in real life or use reference photos to analyze facial proportions, features, and expressions.
Experiment with different drawing techniques and media to find what works best for you. Take classes or workshops, watch tutorials, and seek feedback from other artists to continually refine your skills.
What Are Some Common Mistakes to Avoid When Drawing Faces?
Some common mistakes to avoid when drawing faces include:
- Placing the facial features incorrectly or disproportionately
- Drawing the eyes too close together or too far apart
- Making the nose or mouth too small or too large in relation to the other features
- Neglecting to observe and capture the unique characteristics of the individual
- Overworking the drawing or adding too many details too soon
How Do I Draw Faces With Different Expressions and Emotions?
To draw faces with different expressions and emotions, study how the facial features change with various moods.
For example, a smile involves the upward curve of the mouth and the crinkling of the eyes, while a frown involves the downward curve of the mouth and the furrowing of the eyebrows.
Practice drawing the same face with different expressions, focusing on the subtle changes in the eyes, mouth, and other features. Use reference photos or observe people in real life to capture the nuances of different emotions.
What Are The Best Resources For Learning To Draw Faces?
Some of the best resources for learning to draw faces include:
- Online tutorials and courses from platforms like Skillshare, Udemy, or YouTube
- Art books focused on facial anatomy, proportions, and drawing techniques
- In-person classes or workshops taught by experienced artists
- Practice with real-life models or reference photos
- Studying the works of master portrait artists to analyze their techniques and styles
Conclusion
Drawing faces is a skill that requires practice, observation, and patience.
By understanding facial proportions, studying the unique characteristics of individuals, and experimenting with different techniques and media, you can create stunning, lifelike portraits.
Remember to start with basic shapes and guidelines, then gradually refine your drawing by adding details and shading.
Most importantly, don’t be discouraged if your first attempts don’t turn out as expected – with persistence and practice, you’ll soon be creating face drawings that capture the likeness and essence of your subjects.
Leave a Reply