
As an artist, I’ve always been fascinated by perspective drawing techniques that create the illusion of depth and space on a flat surface. One of the most intriguing and complex forms of perspective is the three point perspective.
In this article, I’ll dive deep into what three point perspective is, how it differs from one and two point perspective, and provide a step-by-step guide on how to draw using this technique.
Table of Contents
What is a Three Point Perspective?
Three point perspective is a method of representing three-dimensional objects on a two-dimensional surface, where all the parallel lines in the scene converge towards three separate vanishing points. These vanishing points are typically located above, below, and at the eye level of the viewer.
In three point perspective, there are three sets of orthogonal lines that recede towards their respective vanishing points, creating a strong sense of depth, height, and distance in the drawing.
This technique is often used to depict scenes with tall buildings, dramatic compositions, or when the subject matter requires showing extreme angles and viewpoints.
The Difference Between 1, 2, and 3 Point Perspective
To better understand three point perspective, let’s compare it with one and two point perspective:
One Point Perspective
Also known as “parallel perspective,” one point perspective uses a single vanishing point on the horizon line. It is suitable for depicting frontal views of objects or scenes, such as building facades or roads receding into the distance.
In one point perspective, all horizontal lines remain parallel to the horizon, while vertical lines remain perpendicular to it.
Two Point Perspective
Two point perspective, or “angular perspective,” utilizes two vanishing points on the horizon line, usually placed on the left and right sides of the drawing. It is often used for illustrating objects or scenes viewed from an angle, like corners of buildings or intersecting streets.
In a two point perspective, vertical lines remain perpendicular to the horizon, while all other lines converge towards one of the two vanishing points.
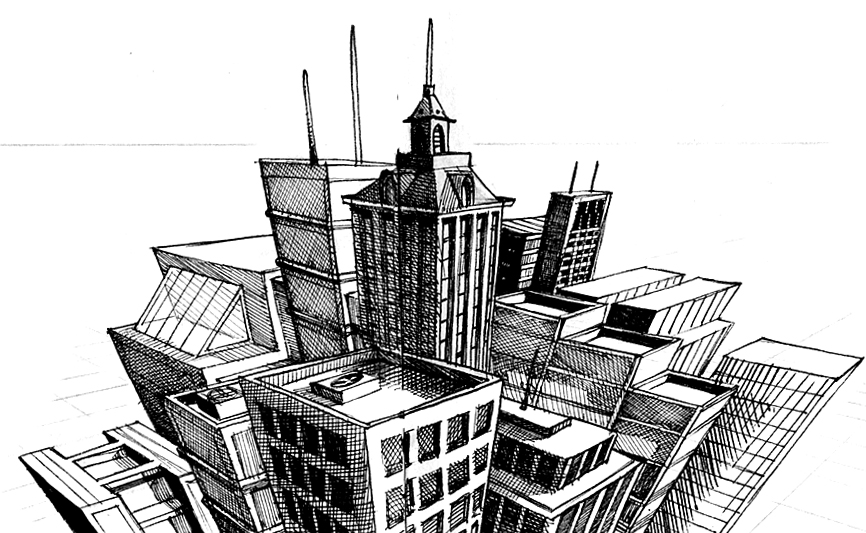
Three Point Perspective
Three point perspective employs three vanishing points – one above, one below, and one at the eye level. This technique offers the greatest flexibility in depicting height, depth, and distance, making it ideal for rendering complex scenes with multiple planes and viewpoints.
In three point perspective, there are no parallel lines; all lines converge towards one of the three vanishing points, including the vertical lines.
Drawing in Three Point Perspective Step-by-Step
Now that we understand the basics of three point perspective, let’s walk through the steps to create a simple drawing using this technique:
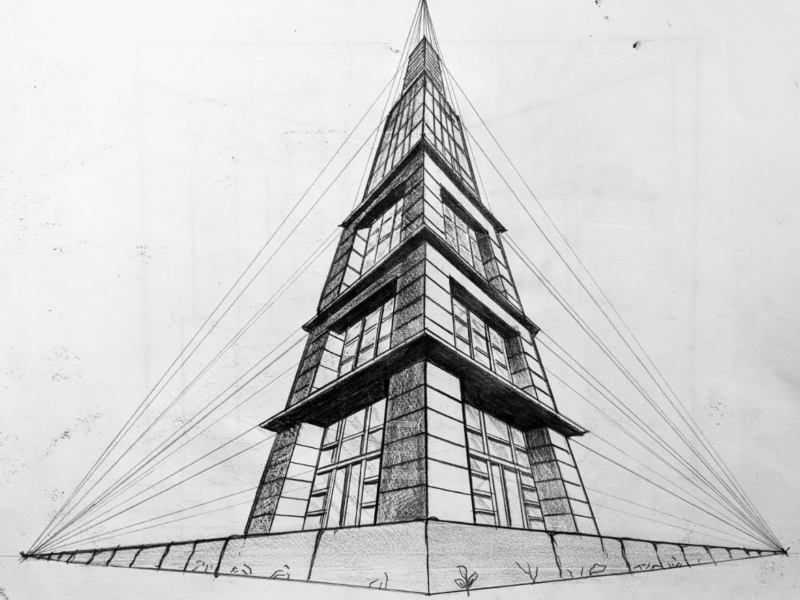
Step 1: Establish the Horizon Line and Vanishing Points
Begin by drawing a horizon line across your paper. If you want to create a “worm’s eye view” (looking up at a tall object), place the horizon line low on the page. For a “bird’s eye view” (looking down from above), place it high on the page.
Then, mark two vanishing points on the horizon line, one on the left and one on the right side of your drawing.
Step 2: Place the Third Vanishing Point
Determine where you want to place your third vanishing point. If you’re creating a worm’s eye view, place it high above the horizon line. For a bird’s eye view, place it far below the horizon.
The exact placement depends on the desired angle and the height of the objects you plan to draw.
Step 3: Draw the First Set of Converging Lines
From your starting point (usually the corner of your main object), draw lines converging towards each of the three vanishing points. These lines will form the edges of your object.
Step 4: Define the Sides of Your Object
To create the sides of your object, draw lines from the endpoints of your first set of converging lines towards their respective opposite vanishing points.
For example, if a line is converging towards the left vanishing point, its endpoint should connect to the right vanishing point.
Step 5: Add Details and Refine Your Drawing
Once you have the basic structure of your object, you can add details like windows, doors, or decorative elements.
Remember that all lines must converge towards one of the three vanishing points to maintain the illusion of depth and perspective. Erase any unnecessary construction lines and refine your drawing as needed.
Tips for Mastering Three Point Perspective
- Practice regularly to develop a strong understanding of how the vanishing points and converging lines work together to create depth.
- Use a ruler or straight edge to ensure your lines are precise and converge accurately towards the vanishing points.
- Experiment with different horizon line placements and vanishing point locations to create various angles and viewpoints.
- Study real-world examples of tall buildings, cityscapes, or interiors to observe how perspective affects their appearance.
- Don’t be afraid to make mistakes! Perspective drawing takes time and patience to master, so embrace the learning process.
FAQs
When should I use a three point perspective instead of one or two point perspective?
Three point perspective is best suited for depicting scenes with extreme angles, tall buildings, or when you want to create a sense of looking up or down at an object. One and two point perspectives are better for more straightforward, eye-level views.
Can I use a three point perspective for drawing objects other than buildings?
Absolutely! While three point perspective is commonly used for architectural scenes, you can apply this technique to any object that requires a sense of height and depth, such as vehicles, furniture, or even characters.
How do I avoid distortion when using a three point perspective?
To minimize distortion, try to keep your main subject within the triangle formed by the three vanishing points. Objects drawn outside this triangle may appear distorted or unnatural. Additionally, avoid placing your vanishing points too close together, as this can create an exaggerated sense of perspective.
Conclusion
Three point perspective is a powerful tool for creating dynamic, immersive drawings that capture a strong sense of depth and space. By understanding the principles behind this technique and practicing the step-by-step process, you can unlock a new level of artistic expression in your work.
Remember, mastering a three point perspective takes time and dedication. Don’t be discouraged if your first attempts don’t turn out perfectly – with each drawing, you’ll gain a better understanding of how to manipulate space and create convincing illusions on paper.
So grab your sketchbook, start experimenting with vanishing points and converging lines, and let your creativity soar as you explore the captivating world of three point perspective!
Leave a Reply