

Cleaning your brushes after oil painting might not be the most exciting part of the process, but it’s crucial for maintaining their quality and longevity.
There are various methods for cleaning brushes, and it’s essential to do it correctly to ensure they last.
From using solvents to soaps, there are options for every type of brush. Bristle, sable, or synthetic, each requires specific cleaning techniques to keep them in top condition.
In this guide, we’ll explore the right ways to clean your oil brushes, helping you extend their lifespan and keep them ready for your next masterpiece.
How To Clean Oil Paint Brushes?

Cleaning oil paint brushes is essential to maintain their quality and prolong their lifespan. Leaving paint to dry on the bristles can ruin them.
Fortunately, there are simple methods to clean brushes. You can use solvents such as turpentine or opt for safer alternatives like oil and soap.
Learning how to properly wash your brushes, dry them. Additionally, it’s important to dispose of used materials safely to avoid any environmental harm.
So, whether you’re a beginner or a seasoned artist, knowing how to clean your oil paint brushes is crucial for keeping your tools in top shape.
Cleaning Oil Paint Brushes with Solvents
Cleaning oil paint brushes with solvents can be done in a few simple steps:
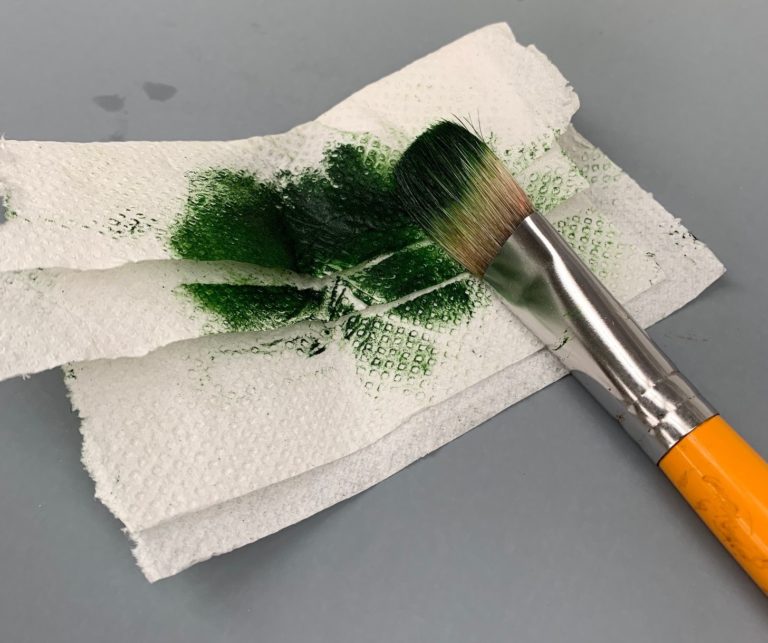
- Start by wiping off excess paint from the brush using a paper towel or newspaper. Wrap the paper around the metal part (ferrule) of the brush and gently squeeze and pull it through the bristles. Repeat this a few times to remove as much paint as possible.
- Swish the brush in a jar of turpentine, paint thinner, or mineral spirits. Make sure the solvent covers the bristles completely. Avoid crushing the bristles against the bottom of the container as it can damage them. Gently push the brush on the side of the jar to help saturate it with the solvent.
- Wipe the brush on a paper towel and dip it into a new jar of solvent. Tap the brush on the edge of the jar to remove excess solvent. Then, wrap a clean paper towel around the bristles and pull the brush through it. Repeat this process with a new container of solvent until the brush appears clean.
- If needed, swirl the brush in a third container of solvent. This helps ensure the majority of the paint is removed. Each container of solvent should appear less cloudy than the previous one.
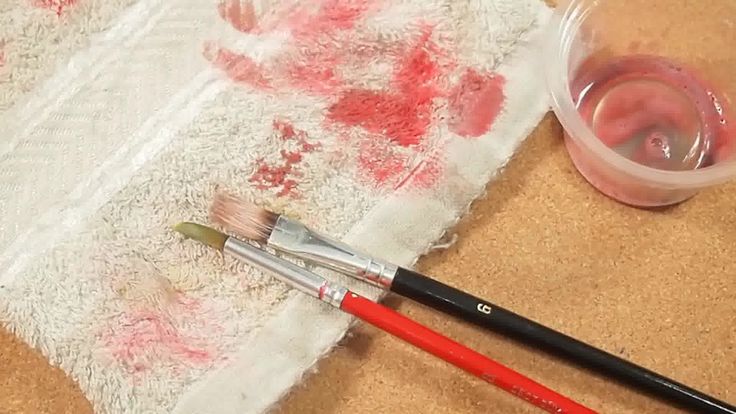
- Once the paint is mostly removed, lather the brush with soap and rinse it with warm water. Use dish soap or a paint brush cleaner to create a lather on your hand and brush the bristles back and forth until the soap turns the same color as the paint. Rinse the brush under warm water and repeat until the soap no longer changes color.
Remember not to use hot water, as it can damage the brush. Washing the brush with soap removes any remaining paint and solvent residue from the bristles.
Cleaning Oil Paint Brushes with Natural Oils
Cleaning oil paint brushes with natural oils can be done in a few simple steps:
- Start by removing as much excess paint as possible. You can do this by gently wiping the brush on a paper towel or a piece of newspaper. Just gather the paper around the bristles and pull it through a few times. Be gentle though, don’t smash the brush on the paper, or you might damage it.
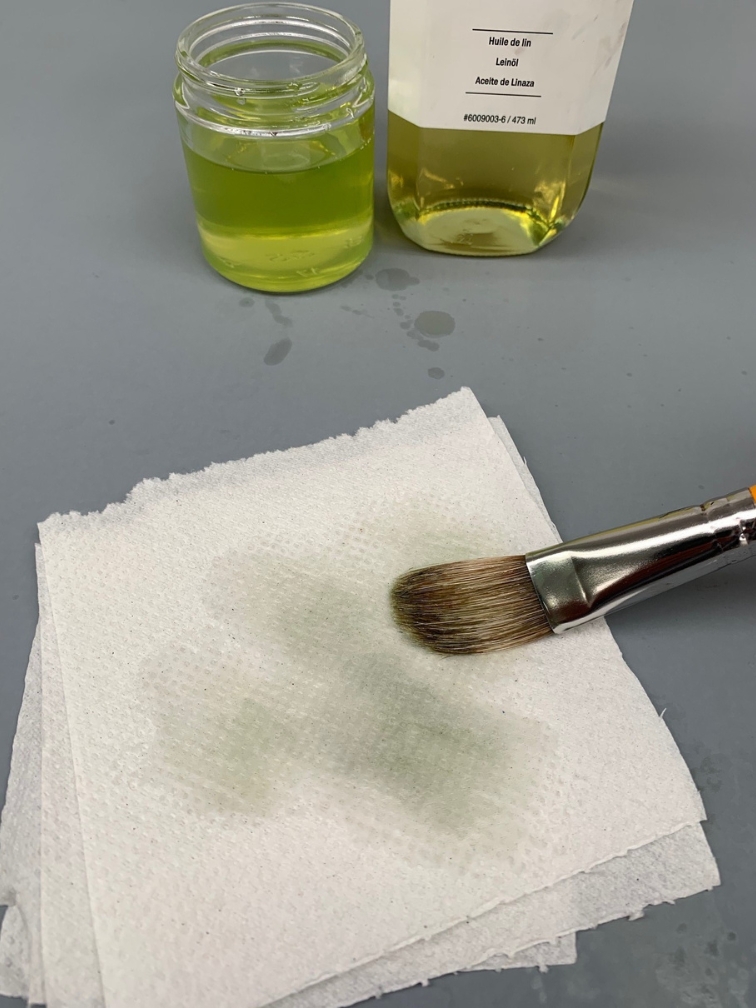
- Next, dip your brush into a container of natural oil like linseed, safflower, or walnut oil. Make sure there’s enough oil in the container to cover the bristles. Then, gently brush and bounce the brush against the bottom of the container to loosen the paint. Other oils like olive, poppy, vegetable, mineral, or even baby oil can work too.
- After that, wipe the brush with paper towels and dip it in oil again until the brush is clean. Squeeze the paper towel over the bristles and brush back and forth to remove any remaining paint. Keep doing this until the brush is clean.
- Once the paint is mostly gone, clean the bristles with soap and warm water. Massage some dish soap or brush cleaner into the bristles until it forms a lather, then rinse it off with warm water. Repeat this until the water runs clear and the soap is all gone.
By following these steps, you can keep your oil paint brushes clean and ready to use for your next masterpiece!
Cleaning Oil Paint Brushes with Soap
Cleaning oil paint brushes with soap can be done in a few simple steps:
- Start by wiping your brush with a paper towel or newspaper. Wrap the base of the bristles and gently squeeze them as you pull the towel over them. Repeat this a few times to remove excess paint.
- Now, it’s time to lather up your brush. You can use bar soap, dish soap, or Murphy Oil Soap. If you’re using bar soap, run your brush under warm water and drag it back and forth across the soap until it starts to foam. If you’re using liquid soap, pour a bit into your hand and work the bristles through it.
- Rinse the brush with warm water and massage it with more soap. Keep doing this until the soap and water stop changing color from the paint. This might take a few rounds of rinsing and washing.
- Periodically wipe the brush across a clean paper towel to check if all the paint is removed. If there’s still paint coming off onto the towel, continue washing until it’s clean.
By following these steps, you can effectively clean your oil paint brushes and keep them ready for your next masterpiece!
How to Store Your Brushes After Cleaning?
After cleaning your brushes, it’s important to dry them properly before storing them.
Here’s what you should do:
- Dry Horizontally: After cleaning, lay your brushes flat horizontally to dry. Don’t stand them upright with the bristles facing up because water can seep down into the handle, causing damage.
- Wipe Down Handles: Before drying, wipe down the handles with a paper towel or rag. This prevents the wood from cracking or swelling due to moisture.
- Store Vertically: Once your brushes are completely dry, store them vertically with the bristles facing upwards. This prevents mold growth on the brush hairs. Make sure to keep them in a well-ventilated room to maintain their quality.
Following these steps ensures your brushes stay in good condition and are ready for your next painting session.
Conclusion
In conclusion, cleaning your oil paint brushes is a vital part of maintaining their quality and ensuring they last for many future artistic endeavors. Whether you choose to use solvents, natural oils, or soap, the key lies in thoroughness and care.
By following the appropriate cleaning method for your brushes and storing them properly afterward, you can preserve their condition and keep them ready for your next masterpiece.
Remember, the effort you put into cleaning your brushes pays off in the longevity of your artistic tools and the quality of your artwork.
So, embrace the cleaning process as an essential part of your artistic routine, knowing that each brush you care for will serve you well in your creative journey.
Leave a Reply